Show All Category
Endotracheal Tube, Cuffed

Irrigation Syringes

Irrigation Syringes

We all know how important it is to keep our teeth and gums healthy - but what about our sockets? While we often don't think about them, a clean socket can help prevent infection and keep your mouth in top condition. We will explore how something as simple as an irrigation syringe can help us thoroughly clean our sockets - learn more here!

Description
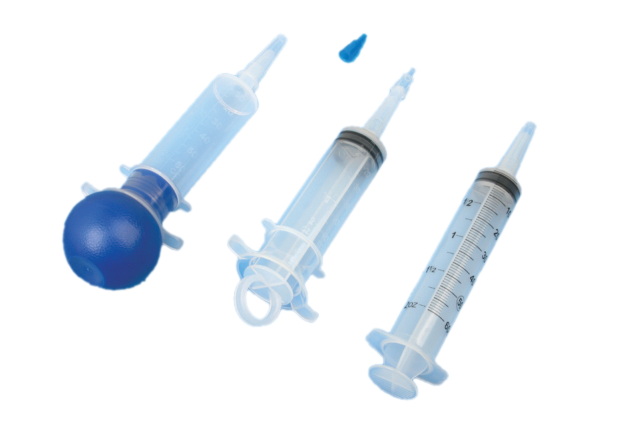
  • Bulb type, ring type, flat type available.
  • Wide and thick folded barrel ear, comfortable to hold, resistant to distortion. irrigating the wound from infection.
  • Capacity: 60ml.
  • PE or blister pack.
Ref. No.: Type: Qty.Cs:
NMH000203 Bulb 50 PCS / CTN
NMH000202 Ring 50 PCS / CTN
NMH000201 Flat 50 PCS / CTN

Introduction

If you're anything like me, you're always looking for ways to make cleaning your sockets a little easier. Well, I'm here to tell you that irrigation syringes can be a huge help! Irrigation syringes are designed to deliver a stream of water to clean out dirt and debris from your sockets. They're usually very affordable, and you can find them at most drugstores or online. To use an irrigation syringe, simply fill it with lukewarm water and insert the tip into your socket. Gently squeeze the bulb to release the water, and then tilt your head so that the stream of water flows into your socket. Rinse out your socket several times with fresh water until the water runs clear. I found that using an irrigation syringe really helped me get my sockets clean, and it was much easier than trying to use a cotton swab or other device. If you're looking for an easy way to clean your sockets, I highly recommend giving irrigation syringes a try!

How to Prepare

We all know how important it is to keep our sockets clean. But sometimes, no matter how much we scrub, they just don't seem to get clean enough. That's where irrigation syringes come in. Irrigation syringes are designed to flush out dirt and debris from your sockets, leaving them sparkling clean. Here's how to use them:


1. Fill the syringe with warm water. You can also add a little bit of soap if you like.


2. Insert the tip of the syringe into your socket and squeeze the plunger gently.


3. Let the water flow into your socket for a few seconds, then remove the syringe and allow the water to drain out. Repeat if necessary.


4. Dry your socket with a clean cloth or tissue.


That's it! Using an irrigation syringe is a quick and easy way to get your sockets super clean - give it a try next time you're having trouble getting them sparkling!

What You'll Need

In order to thoroughly clean our sockets with an irrigation syringe, we will need the following items:

-A soft, clean cloth

-A cup of warm water

-An irrigation syringe (available at most pharmacies)

-Cotton swabs

-A mirror

Once you have gathered all of the necessary supplies, follow these steps:


1. Wet the cloth with warm water and gently wipe around the outside of your socket. This will loosen any dirt or debris that may be clinging to your skin.


2. Fill the syringe with warm water and aim the tip into your socket. Gently squeeze the plunger to release a stream of water into your socket. Be careful not to force too much water into yoursocket at once, as this can cause discomfort.


3. Continue flushing water into your socket until it runs clear. You may need to do this several times before all of the debris is removed from yoursocket.


4. Once the socket is clean, use cotton swabs dipped in warm water to remove any remaining debris from inside the socket.


5. Finally, take a look in the mirror to make sure that yoursocket is clean and free of any foreign objects.

Step One: Rinse the Socket With Water

If your socket is full of debris, the first step is to rinse it out with water. You can do this by using a syringe with the tip cut off, or by using a cup or similar container. Fill the syringe or container with water and direct the stream into your socket. Rinse thoroughly until all the debris is gone.

Step Two: Fill a Syringe of Saltwater With Your Clean Hand

If the syringe does not come with a pre-attached needle, carefully screw the needle onto the syringe. Fill the syringe with salt water by holding it upright and drawing the plunger back. It is important to use clean hands when handling the syringe and needle. Wipe the top of the vial or bottle of salt water with an alcohol swab to sterilize it before attaching the syringe. To fill the syringe, insert the needle into the vial at a 45-degree angle and pull back on the plunger until the desired amount of salt water is drawn into the syringe. Be careful not to touch anything with the needle except for the vial or bottle of salt water.

Step Three: Use the Syringe to Irrigate the Sockets With Water

1. Fill the syringe with water.


2. Aim the syringe tip into one of your nostrils, and gently squeeze the plunger to release a stream of water into your nose.


3. Doing this will help to flush out any irritants or dirt that may be present in your nasal passages.


4. Repeat the process on the other side.


5. Once you have finished irrigating your nostrils, blow your nose gently to remove any residual water.

Irrigating Syringe, Today I’m going to talk about the effect of needle insertion depth on irrigant flow in the root canal. Irrigating Syringe

Irrigating Syringe

There have been countless articles published over decades describing the exchange of irrigants based on how deep the needle is inside a shaped root canal. In fact, there are a lot of controversies and so we have to step back just a little bit so we can better appreciate irrigant exchange. First of all, irrigants have been dispensed through typically large diameter stainless steel needles. In recent years, we’ve been able to use nickel titanium cannula which is much more flexible and we’ve been able to use gauges anywhere from 29, 30, and 31. In a well-shaped canal, this type of gauged needle will easily work itself through curvatures and into the apical one-third of a well-shaped canal. The thing I want to talk about is typically, probably, controversial because there’s misinformation and, because there’s such a diversity of opinions, we have different speakers and journal articles and textbooks all reporting things that are quite confusing. Let me explain. It has been reported repeatedly that we can only really irrigate about 1-2 mm apical to the level of the needle in the canal. I’d like you to think about this and ask yourself, "Is that true?" Because if you assume that that’s true, then lots of things will happen procedurally based on those belief systems. The side bent needles need to be discussed, just briefly. There are a lot of different canula and gauges as I have mentioned. There are different thoughts regarding – Do you have side port delivery, Irrigating Syringe or do you have a flat 90° angle to the long axis of the cannula in the irrigator? Or, do you side irrigate? Most people have traditionally used a beveled needle and irrigated through the very terminal end of the cannula; however, because of the concern with sodium hypochlorite accidents, manufacturers have produced side port irrigation devices, presumably so that you can’t irrigate through the apical end, the most distal extent of the cannula, but rather the irrigant has to move laterally. Well, pretty much if you want to exchange irrigant in a well-shaped canal, you do not want lateral, side port delivery. This is very, very ineffective. Although you could argue that it would reduce the potential for sodium hypochlorite accidents. So now I have to digress further and say that we can pretty much eliminate sodium hypochlorite accidents if we simply do two things. One, keep your hand moving as you progressively dispense reagent into the shaped canal. If the hand is moving, the needle then can never be locked up inside a shaped canal where the canal becomes an extension of the canula. This will clearly invite or promote driving reagent through the foramen and this can cause quite an upset, such as the reported sodium hypochlorite accident. The other thing to be aware of when you’re irrigating is – move the plunger slow. Slow plunger speed equates to a very sustained gentle type of irrigation where we’re not trying to hydraulically drive irrigant deeper than the canula. So, keep your hand moving and dispense the reagent in a slow rate... that means mLs per seconds of time. Your office can figure out what’s appropriate for you. So, back to our question – How deep do we deliver reagent apical to the canula? You can begin to see it’s based on the shape of the canal; it’s based on the gauge of the canula itself. It has to do further – Is it side port or is it end delivery? What I want to say is – the articles are largely talking about ‘end delivery’. They’re largely talking about shapes that are quite large apically so that you can get the canula deep into the canal. But, let’s just cut to the chase. The articles will say that you can only effectively exchange irrigant 1 or 2mm apical to the level of the canula in the shaped canal. I totally disagree with this, but yet article, after article, after article continues to make these assertions. Here’s what I would like you to do: The way they conducted their methodology would explain their results. So, in other words, their results are honest, their results are accurate and there are big limitations based on how they irrigate. What they are basically doing is pressing on the plunger and moving reagent through a cannula and they’re looking at different fluid dynamic models to assess fluid movement. In most instances, Irrigating Syringe these magazines will report that a side bent needle can achieve replacement to working length only if the needle is 1mm short of the full working length. Whereas they’ll say an open-ended needle that’s flat on the end, it can be a little further back at the 2mm level and still you’ll see fluid exchanged in that apical 2mm.